Overview
Palora is a versatile, full-range subtractive synthesizer — plucks, basses, leads, pads, keys, stabs, and evolving textures — distinguished by a dedicated attack engine: a Click generator paired with a per-voice Transient Shaper that give precise control over how every sound begins.
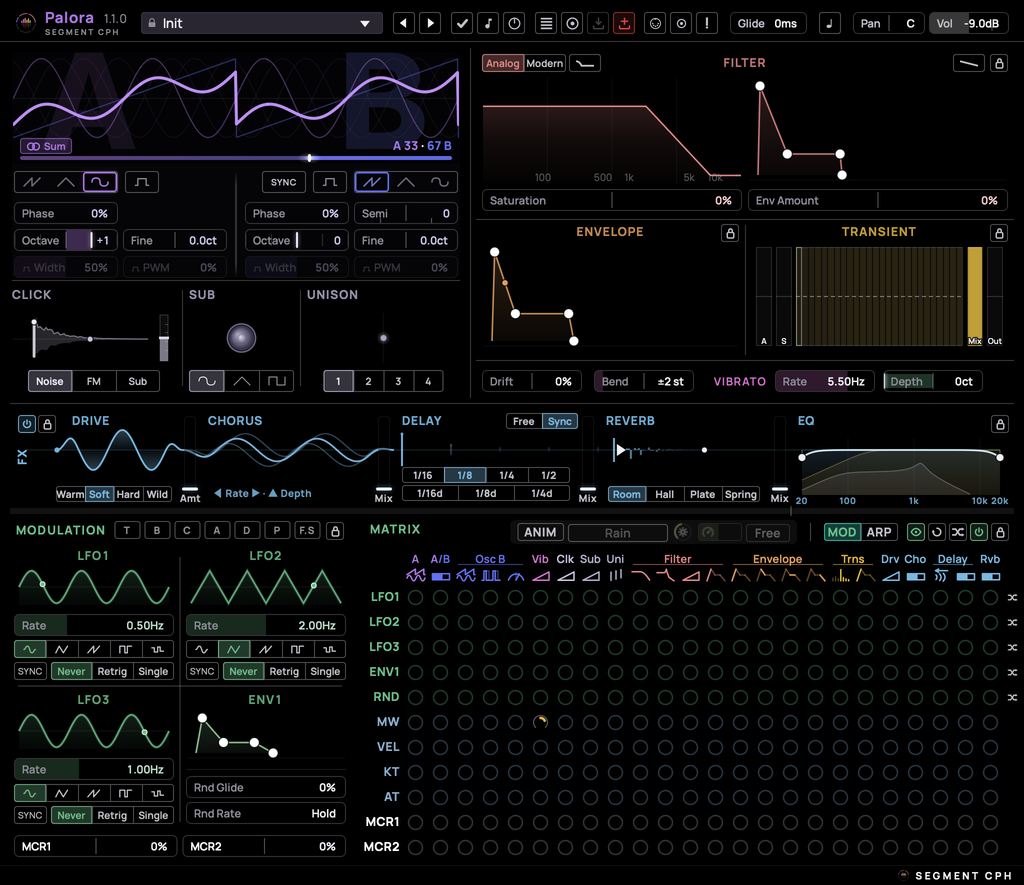
Toolbar
Palora's top row is the global Toolbar. From the left: Logo - click to open the info panel, where you will find your license status and support links.
Preset section
Here you can browse for presets and navigate through them with navigation-buttons. Next is the "Keep" button used for marking presets you want to keep, so you can easily clean up a bank, for example one created by an AI agent for you. Then there is Audition that lets you hear the current preset with a small melody and lastly the "Preset chaser", a neat function that lets you get a quick overview of which parameters were altered by the current preset, compared to the INIT preset.
The list-button opens the preset browser, which also holds the Settings and MIDI tabs. Then there is another "chaser" button, the "Dirty chaser" that shows you every parameter you have touched since the preset was loaded. Save updates the loaded preset; Save As creates a new one in My Presets.
If you make any changes to a preset, the Save button will turn red (SaveAs for Factory presets).
MIDI
MIDI Map is for assigning a controller to any parameter in Palora. When in mapping-mode, click a control, then move a
knob on your controller and it is instantly mapped. The button beside it is the "MIDI chaser" that shows you which parameters are mapped.
! Panic silences all voices and clears the delay and reverb tails.
The Toolbar ends with Glide that sets how long the pitch takes to slide between notes, Mono that switches between monophonic and polyphonic voices, Pan (saved with the preset) and Global Volume (global, not saved with a preset).
Oscillators
The sound engine consists of 2 oscillators, A and B, mixed with the Sub and Click before the filter.
Drag or scroll the big visualizer to mix between the two oscillators. At full A, Oscillator B makes no sound. Sum changes the picture only: the two oscillators drawn separately, or their combined output.
Shape blends continuously from saw through triangle to sine. Click an icon to jump to that shape, or drag to any point between. Pulse switches the oscillator to a pulse wave; clicking the Shape strip switches it back. While Pulse is on, Width sets the pulse width and PWM sets how far LFO 1 sweeps it.
Octave and Fine set the pitch, and Oscillator B lets you move Semi-tones. With Sync on, B restarts on every cycle of A, so B's pitch controls change its timbre rather than the note you hear.
Phase sets where the oscillator starts on each note. On Oscillator A, zero means a random start for every voice. On Oscillator B, zero is a fixed start, so its unison voices begin together. While Sync is on, B's Phase is ignored and B starts in step with A.
Click and Sub
Two more sound layers on every note, mixed with the oscillators before the filter. At a Level of zero, either layer is off.
Click is a short burst at the start of each note. Dial in the level and decay directly on the visualizer. Use the range-lever to control the low pass filter for Click, also shown in the EQ in the FX-river. Choose between 3 types of Click: Noise is filtered noise alone, a tick. FM adds a metallic ping an octave above the played note. Sub adds a low thump at the same pitch on every note.
The Sub oscillator plays exactly one octave below the note you play, whatever the oscillators' Octave, Semi and Fine are set to; it still follows pitch bend, vibrato and glide. Drag the orb up or down for Level, and pick between sine, triangle or square.
Unison
Unison sets how many copies of each note play. Both oscillators are stacked; the Sub and the Click are not. More voices do not make the note louder.
With two or more voices, the voice cloud is a drag pad: sideways sets Spread, how far the copies are panned across the stereo field, up or down sets Detune, the total pitch spread between them. With Oscillator A's Phase at zero, every copy starts at a random point, so the stack does not start phase-locked.
Filter
A low-pass ladder filter on each voice. Both oscillators, the Sub and the Click are mixed and pass through it. Saturation drives that mix before the filter, adding harmonics without raising the level.
Analog and Modern set the filter-character. Analog is warm and saturating; Modern is cleaner, with less saturation. Both use the same settings, so a sound can be compared on each.
Drag the visualizer sideways or scroll for Cutoff. To change Resonance, start the
drag at or under the peak, which glows when you point at it, and drag up or down.
⌥/Alt with the drag/scroll changes Resonance alone.
The envelope display on the right is the filter's own ADSR: drag its points to shape it. Env Amount sets how far the envelope opens the cutoff; at zero, the envelope has no effect.
Bass Comp adds low end before the filter as Resonance rises. Tilt adds low end after the filter as the envelope closes, so a falling sweep keeps its weight.
While Lock is lit, loading a preset leaves every control in this panel as it is. Key tracking reaches the cutoff, and velocity the envelope amount, through the matrix.
Envelope
The amplitude (or AMP) envelope: the level of every note over time. Drag or scroll its points on the visualizer. Each phase has its own point: Attack, Decay, Sustain and Release. ⌥/Alt+drag/scroll on the Decay corner changes Decay alone. Drag the decay line itself for Curve: up holds the level longer before it falls, down makes it drop fast like a pluck.
Decay and Curve only matter once Sustain is below full. At zero Sustain the note ends after the decay, even while the key is held. A note retriggered while still sounding, in Mono or legato, rises from its current level rather than from silence.
While Lock is lit, loading a preset leaves the envelope as it is. This envelope controls level only and cannot drive other controls; key tracking and velocity reach its stages through the matrix.
Transient
A transient shaper on each voice, after the filter and the envelope. It detects the start of each note in the signal and turns the attack and the rest of the note up or down, separately. With Attack and Sustain both at zero it changes nothing, and a Mix of zero switches it off completely.
The display reads left to right. ATK sets Attack and SUS sets Sustain; drag/scroll up or down. The center visualizer shows the live frequency spectrum the shaper hears. Its dashed line is Sense: Set Sense higher, and softer hits also count as transients. Drag or scroll anywhere on the spectrum to move Punch, the frequency above which the shaper works. The sound below it passes through, so lower settings shape more of the note. MIX blends the shaped signal with the unshaped one. OUT only displays: it holds the gain Attack applied to the last note until the next.
Because it acts after the filter, a Cutoff below Punch leaves it less to work on. While Lock is lit, loading a preset leaves all five controls as they are.
The envelope gives every note the same shape. The shaper responds to each note as it actually starts.
Vibrato and bend
A row of bars under the Envelope and Transient panels: Drift, Bend, and Vibrato Rate and Depth.
Drift gives each note a slow random pitch wander of a few cents at most. Each note wanders on its own, so the notes of a held chord drift against each other. The unison copies of one note share its drift; spreading them apart is Detune's job.
Bend sets how far the pitch wheel bends, up and down. Bend and vibrato move the whole voice, the Sub included.
Vibrato is its own sine oscillator, separate from the three LFOs. There is one vibrato for all notes, so a chord wobbles together. Depth sets vibrato that is always on.
To let you control vibrato with the Modulation Wheel (MW), every preset has a default matrix mapping from MW to Vibrato. The wheel therefore adds vibrato even when Depth is at zero. Remove the matrix mapping, if you don't want the Modulation Wheel to control Vibrato.
Effects
The "FX-River" is one cohesive stereo chain after the voices are mixed, in a fixed order and drawn as one cable: Drive, Chorus, Delay, Reverb, EQ. Each of the first four has a thin fader for its amount or mix; at zero, that effect is silent.
Drive saturates the sound, with four types: Warm, Soft, Hard and Wild. On Chorus, drag sideways for Rate and up or down for Depth. Delay runs in Sync, as a note division that follows the host tempo, or Free; clicking a division switches it to Sync. Drag up or down for Feedback, and in Free sideways for Time. Reverb has four types, Room, Hall, Plate and Spring. Drag on the gap before its tail for Pre-Delay, and on the tail for Size.
The EQ is a high-pass and a low-pass filter on the output; a drag moves whichever is nearer. The power switch bypasses Drive, Chorus, Delay and Reverb and is saved with the preset; the EQ stays on. Two separate Locks keep the effects and the EQ as they are when a preset loads.
Modulation sources
To give a preset "life" the modulation section lets you dial in 3 LFOs, one envelope, a randomizer and 2 macros.
LFOs
Three LFOs, each with a live display, a Rate, a shape, and a SYNC switch that turns Rate into a note division following the host tempo.
Envelope
ENV1 is a second envelope for each note. It does nothing until it is routed; drag or scroll its points as on the other envelopes.
Randomizer
Use it to give each note its own random value(s). At a Rnd Rate of zero the value is picked once per note and held; above zero it changes while the note plays, and Rnd Glide smooths between values.
Macros
Two Macro bars for playing a preset by hand. Route a macro to as many destinations as you like in the matrix. At the centre it does nothing; move it either way and every destination it is routed to moves with it, up or down from where that control is set.
While Lock is lit, loading a preset leaves the LFOs, ENV1, Rnd and the Macros as they are.
The matrix
The matrix grid lets you map any of the 11 sources to any of the 24 destinations,
which are parameters in the Palora UI.
Sources
Down the side (Y-axis) you see the Sources. They are the 7 Modulation sources
and four MIDI-sources: Modwheel (MW), Velocity (VEL), Keytrack (KT) and Aftertouch (AT).
Click any of them to reveal them in the UI. ⌘/Ctrl-click a source name to bypass its row.
In the end of the first 5 source-rows there are randomize buttons to randomly add mappings to destinations.
Destinations
Across the top (X-axis) are the 24 destinations. They all connect the matrix to one of the destinations in the Palora UI. The colouring lets you quickly see which section they belong to, and clicking a destination reveals it in the UI for you.
The cells
Any number of cells can be activated (mapped) at any given time. Click an empty cell to route it, click a routed cell to remove it. Drag or scroll up or down for the amount, positive or negative.
The amount is an offset along the destination control's own travel, added to
where the control is set. All routings into one destination add up and stop
at the control's ends.
Macros push both ways from their centre; ENV1, the mod
wheel, velocity and aftertouch push one way, in the direction of the amount.
On LFOs, Rnd and key-track cells, ⌘/Ctrl-click switches between one way and both
ways around the set value.
Click the Matrix title to highlight every routed destination in Palora's UI.
Header controls
Animation
This section is mostly for a bit of fun. When you turn on animation, the matrix is treated like a pixel-matrix
where an animation of your choice (select from the dropdown) runs through the matrix cells.
A few animations are controlled from Palora's audio output, the visualizers: VU-Meter and Segment CPH.
And a few can actually be controlled by you, the games: Rebound and Swarm. Control motion via Pitchbend wheel and shoot (Swarm) when any note on your midi-keyboard is played.
Dial in animation brightness and speed. You choose between 3 modes:
Free - runs on its own clock all the time, whether or not the DAW is playing. The Speed slider sets how fast. It's the default mode.
Sync: the speed follows the DAW's tempo, and a note-length menu (1/1 to 1/32, including dotted and triplet) replaces the slider. It speeds up and slows down with the tempo but doesn't line up with bars or beats. It only runs while the DAW is playing.
Gate: the same slider speed as Free, but it only runs while the DAW is playing. Despite the name it has nothing to do with notes; the gate is the DAW's play state.
MOD / ARP selector
Switch between Modulation matrix and Arpeggiator matrix.
Modulation controls
"Edit spotlight" turns the highlighting effect on/off.
With it turned ON when you add or edit a mapping, the UI dims and only the source and destination involved in the mapping light up.
The Reset button clears every routing, every one-way/two-way setting and every row bypass (⌥/Alt click to undo), Randomize varies the LFO, ENV1 and Rnd rows, and Power bypasses all routings without clearing them; Power and row bypasses are not saved in presets. Finally Lock keeps the routings when a preset loads.
Arpeggiator
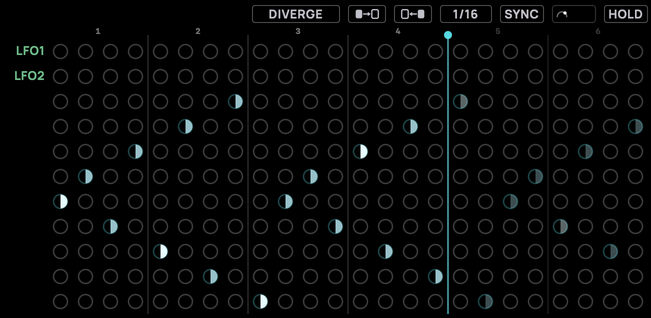
With the MOD / ARP switch on ARP the matrix grid becomes a step sequencer; it does not
turn the arpeggiator on, only enters ARP-edit mode.
Columns are steps. The bottom nine rows hold the
notes you play, the lowest on the bottom row; when the chord runs out, the
notes repeat an octave higher until all nine rows are full. There is no
octave control. A pattern plays whatever chord or single-note you hold.
The top two rows are bound to LFO 1 and LFO 2. A lit step there plays one note from the rows below, picked by that LFO's value at that moment: random with sample-and-hold, drifting up and down with a slow waveform. ⌥/Alt-click such a step to mirror the pick.
Click to add or remove a note, drag up or down on it for its length, and ⌘/Ctrl-drag for its velocity. On the ruler above, drag the teal dot for the loop length and ⌘/Ctrl-drag for swing.
With Power on, your keys feed the arpeggiator once at least one step can play; until then they play normally. Hold keeps it going after you let go, and so does the sustain pedal. The control row has templates, copy between the two halves of the pattern, Rate or Division, Free or Sync, and Swing. The arpeggiator has its own Lock.